Squat Technique: how to Do This Exercise Properly

Squats are an exercise that works out the thighs, glutes, hips, and abdomen. In addition, it strengthens your ligaments, bones, and tendons. This exercise forms a part of many different workout routines, thanks to its effectiveness. But, in order to get results, you need to practice proper squat technique.
When you do squats correctly, they work out the muscles and help you avoid possible injuries or pain. This is important because hurting yourself could affect your future performance. In this article, we’ll show you how to master the squat technique. Keep reading!
It’s important to ensure that you’re performing a well-executed squat. We can’t overstate the importance of using the correct technique, given that you could be at risk of exposing yourself to a torn meniscus or Achilles. But, don’t worry! Follow these steps to learn how to apply the proper squat technique.
1. Squat technique: stand up straight
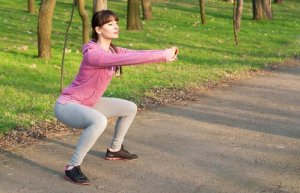
The way you stand is the beginning of the squat, and important in terms of establishing balance. For this reason, you need to stand with your feet hip-width apart. This means that they can’t be too close together or too far apart. Your back needs to be straight, not arched or hunched. Finally, look straight ahead and squeeze your abdomen in.
2. Hands in front
Put your hands out in front of you, at shoulder-height. Keep your arms stretched out, but make sure they’re not tense. This will help you to maintain balance during the squat. You can also put your hands on your hips if you have enough body control to stay balanced throughout the exercise.
3. Bend your knees
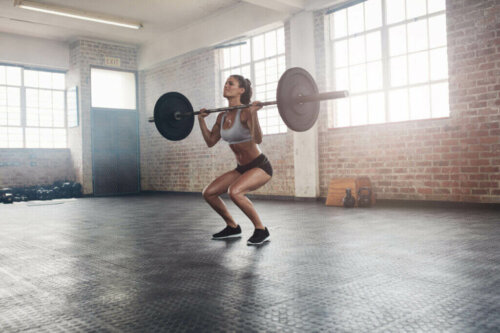
This is a crucial moment and is at the heart of the exercise during the squat itself. The bending of the knees shouldn’t be abrupt, nor should it be slow. Lower your body as though you were sitting on an imaginary chair. The thighs should finish in a horizontal position (never diagonal), and the calves should form a 90-degree angle.
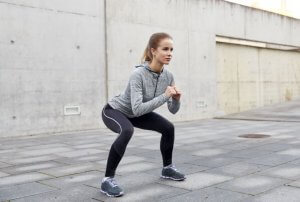
It’s essential to keep your knees aligned with your toes. Your knees should never surpass your toes. If they do, you’re putting yourself in a dangerous position. In addition to the risk of injury, you won’t exercise the muscles properly. Therefore, you need to keep this in mind when doing squats to avoid putting your joints and muscles at risk.
4. Stretch
This is the final part of the exercise, the return to the starting position. When stretching your knees, make sure that you maintain the overall posture. This means that your back should be straight, your abdomen contracted, and your gaze straight ahead. Don’t draw strength from the torso. Instead, focus on using the energy of the abdomen, thighs, and glutes.
Take your time
Take all the time you need to perform a squat properly. If possible, do them in front of a mirror during the first few times, in order to make sure you’re using the correct technique. Although they may seem unimportant, small details such as aligning your knees and keeping your back straight will guarantee the effectiveness of the exercise.
Once you’re accustomed to using the proper squat technique, you can try other, more challenging variations. What’s more, learning to do squats correctly will help your technique for other exercises, including burpees, deadlifts, and weight training.
Squats improve your posture and burn calories. Additionally, the movement is implicit in our day-to-day activities, whether we’re sitting down in a chair, or getting out of bed. This is one of the movements you’re going to have to be able to do, so make sure you’re doing it the right way!
Squats are an exercise that works out the thighs, glutes, hips, and abdomen. In addition, it strengthens your ligaments, bones, and tendons. This exercise forms a part of many different workout routines, thanks to its effectiveness. But, in order to get results, you need to practice proper squat technique.
When you do squats correctly, they work out the muscles and help you avoid possible injuries or pain. This is important because hurting yourself could affect your future performance. In this article, we’ll show you how to master the squat technique. Keep reading!
It’s important to ensure that you’re performing a well-executed squat. We can’t overstate the importance of using the correct technique, given that you could be at risk of exposing yourself to a torn meniscus or Achilles. But, don’t worry! Follow these steps to learn how to apply the proper squat technique.
1. Squat technique: stand up straight
The way you stand is the beginning of the squat, and important in terms of establishing balance. For this reason, you need to stand with your feet hip-width apart. This means that they can’t be too close together or too far apart. Your back needs to be straight, not arched or hunched. Finally, look straight ahead and squeeze your abdomen in.
2. Hands in front
Put your hands out in front of you, at shoulder-height. Keep your arms stretched out, but make sure they’re not tense. This will help you to maintain balance during the squat. You can also put your hands on your hips if you have enough body control to stay balanced throughout the exercise.
3. Bend your knees
This is a crucial moment and is at the heart of the exercise during the squat itself. The bending of the knees shouldn’t be abrupt, nor should it be slow. Lower your body as though you were sitting on an imaginary chair. The thighs should finish in a horizontal position (never diagonal), and the calves should form a 90-degree angle.
It’s essential to keep your knees aligned with your toes. Your knees should never surpass your toes. If they do, you’re putting yourself in a dangerous position. In addition to the risk of injury, you won’t exercise the muscles properly. Therefore, you need to keep this in mind when doing squats to avoid putting your joints and muscles at risk.
4. Stretch
This is the final part of the exercise, the return to the starting position. When stretching your knees, make sure that you maintain the overall posture. This means that your back should be straight, your abdomen contracted, and your gaze straight ahead. Don’t draw strength from the torso. Instead, focus on using the energy of the abdomen, thighs, and glutes.
Take your time
Take all the time you need to perform a squat properly. If possible, do them in front of a mirror during the first few times, in order to make sure you’re using the correct technique. Although they may seem unimportant, small details such as aligning your knees and keeping your back straight will guarantee the effectiveness of the exercise.
Once you’re accustomed to using the proper squat technique, you can try other, more challenging variations. What’s more, learning to do squats correctly will help your technique for other exercises, including burpees, deadlifts, and weight training.
Squats improve your posture and burn calories. Additionally, the movement is implicit in our day-to-day activities, whether we’re sitting down in a chair, or getting out of bed. This is one of the movements you’re going to have to be able to do, so make sure you’re doing it the right way!
This text is provided for informational purposes only and does not replace consultation with a professional. If in doubt, consult your specialist.